
Building shields
There are many ways to build a shield and also many possible uses of shields. On this page I try to show the different stages of building and their possibilities.
If you have any questions, please do not hesitate to contact me. Also, if anyone has any other good tips, I am happy to receive feedback.
(  )
)
Table of Contents
Basic
The shape of the shield follows the function of the shield. The shield has the basic functions of protection and representation and can also be used as a weapon.
Which of the functions is in the foreground and which epoch is to be represented determines which form the shield must have.
If the aim is to show one's allegiance, to represent the High Middle Ages and otherwise to fight with a halberd, then perhaps a small, curved back shield in the shape of a coat of arms is sufficient. It fits well on the back, does not interfere if it is well fastened and clearly shows the symbol.
If the early Middle Ages are depicted, representation is in the background and an active shield is preferred, then perhaps a single-coloured, straight 85 cm round shield is the right one.
Round shields
The round shield has many uses, which are mainly influenced by the size, but also by the shape of the face, the type of hump or the grip. Early medieval shields range from 55-120 cm. In the High Middle Ages, smaller shields of 25-70 cm tend to be used or entirely different shapes.
Shield sizes and their uses
From the small to the large shield, the following possible uses can be distinguished.
- Buckler 25-40 cm
- Single combat shield 35-65 cm
- Shoulder shield 50-70 cm
- Line shield 70-120 cm
- Standard line shield (not curved) 80 cm
- back shield (always arched) 80-90 cm
- active shield (never arched) 85-95 cm
Standard line shield
The 80 is the standard that everyone has or had at some point - always good.
If you want it to fit a bit better, I recommend building a shield as a standard line shield that fits well under the heel of your hand when you are standing normally, so that the shield is next to you. This dimension ensures that one's weapon activity is only slightly restricted and that self-protection is relatively possible with low activity.
Shield thickness, coating and choice of wood
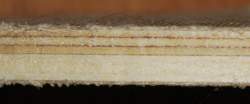 Shield thickness and coating are very important factors in the weight of the shield. Of course, this has an effect in relation to the size of the shield. For a buckler this factor is negligible, but for the standard line shield it is very important.
As a rule, shields are built too thick. Early medieval shields had a maximum thickness of 9 mm near the hump and sometimes only 3 mm on the outer edge, as can also be read in the Thorsberg report.
Any wood can be used for a modern shield. I recommend in any case to use a waterproof glued plywood. Unfortunately, we only use birch. Otherwise poplar works well for light shields if it is coated and beech also works uncoated.
Historic shields were made of boards that were probably glued together and stabilised by the edge or the handle. Alder, poplar and oak have been found as materials, for example in Thorsberg.
For the coating I use linen, as it is stable and also inexpensive. Leather or rawhide would also be possible, but they are much heavier and also usually more sensitive when they get wet. Shields from the Viking Age are thought to have a leather coating, according to the Thorsberg report.
For the Codex Belli free combat I recommend 6 mm waterproof birch plywood with a linen coating on the outside. This has sufficient durability and a good weight.
For full contact fighting I recommend 8 mm waterproof birch plywood with coating on both sides.
Source:Lars Fische Lanzen und Schilde aus dem Thorsberger Moor in Süderbrarup, Kr. Schleswig-Flensburg. Holzarchälogische und technische Aspekte
Shield edge and fastening
The edge should be reinforced in any case, otherwise the weapons will penetrate the edge very quickly and destroy the shield.
This can be done in two ways: a rawhide rim or a leather rim. Both cushion the blow without losing their shape and thus protect the shield edge in the long term. Metal rims are not useful because they are heavy and maintain their deformation, thus forming sharp edges and the damage to the shield continues with each blow.
Advantages and disadvantages of the materials
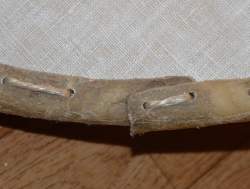 rawhide}}
* + is lighter
* + thin and thus does not visually thicken the edge
* + easy to fix
* - is sensitive to rain (is easily destroyed when wet)
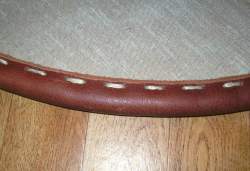 Leather
- + more protection of the other during active use (because more surface and softer)
- + more grip when deflecting spears with the edge
- + more durable
- - more work when fastening
- - heavier
As a fastening, I prefer sewing it down, as it is easier and more flexible. Nailing comes off more easily and sometimes there are sharp edges. In addition, iron consumption should be kept low for an early medieval depiction. If anything, bronze would be appropriate, but it doesn't hold up very well to what we're doin
Advantages and disadvantages of shapes
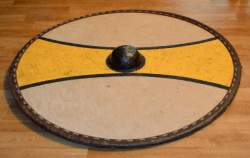 Flat shields have the following advantages:.
- Good in-line connection
- Better transfer of force to the edge, as the distance from the body over the shield to the opponent can be straight.
- Other weapons can be taken in hand (throwing spears, daggers).
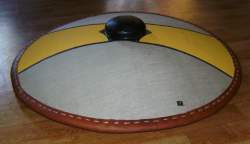 Curved shields have the following advantages:]
- The centre of gravity of the shield lies further towards the wrist and is therefore easier on the joints.
- Good gliding of spears, so that they can hardly transfer force.
- Good sliding of branches when walking through brush.
- Easier to cover the shoulder against axes, as the shield can easily be slid over the shoulder.
- Better carrying comfort when carried on the back.
Handle shapes
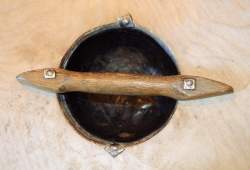 Generally, oval shapes are used as they offer a better feel for the position of the shield. The handle orientation is based on the most common use and is then positioned in the same way as a sword or axe handle.
- Handles that are shaped parallel to the surface are more likely to be used in active shield combat.
- Handles that are shaped perpendicular to the surface are more likely to be used in line combat.
Furthermore, there are differences in the length of the attachment of the grip.
Various finds are present:
- Long or split fastenings are said to stabilise the shield. (For example, on a curved board shield).
- Short fastenings are to maintain flexibility. (For example, in a light line shield).
I recommend not making the handle too long. Only leave up to 6 cm on each side on the sign.
Shield boss shapes
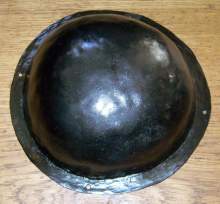 As a rule, a hump made of 1,5 mm iron is sufficient for free fencing.
Thicker humps only add weight. In my experience, a 1,5 mm hump nevertheless lives longer than the associated shield body and can therefore be easily bulged every time the shield body is renewed}}.
The hand hole of modern humps is about 14 cm, the rim is about 2 cm wide.
The historical humps are only a little wider than the hand, i.e. at 9-10 cm.
Since today gloves are part of the compulsory clothing and it makes sense to protect the shield hand as well, today's shield humps have to be larger.
Depending on the fighting style, it makes sense to choose a hump that is slightly larger (1 cm in each direction) than the glove, so that the shield can be dropped and released smoothly.
In most cases, the edge of the hump can be trimmed. This was also done on historical humps. This saves up to 250 g in weight.
Rivets or staples
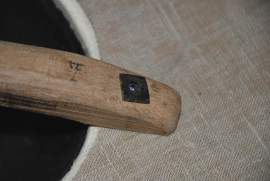 I generally use rivets as the advantages so clearly outweigh the use of staples (folded over nails).
Advantages of rivets over staples:
- Rivets can be thinner and are therefore lighter.
- Rivets retain their contact pressure as they do not bend.
- If there is a hole in the shield near a cramp, the cramp can form a dangerous hook.
Carrying strap
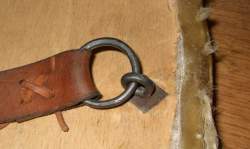 A good shield needs a strap so that it can be worn all day, so that it shows one's position (show one's colours) and can also be carried comfortably on the horse/bicycle. Or also to hang it on one's back to be carried along comfortably, to be carried there relatively free of disturbance or also to extend the way of fighting for two-handed weapons.
There are three main methods of attaching a sling:
- Method 1 can be attached and removed at relatively short notice and then definitely does not interfere during combat.
- Method 1 is relatively difficult to remove from the shoulder during combat.
- Method 1 is relatively wobbly due to the single-point suspension.
- Methods 2 and 3 allow for comfortable back carrying
- Methods 2 and 3 do not wobble much when walking or fighting
- With methods 2 and 3, when carried on the back, it can happen that in a narrow passage narrower than the shield, the shield gets caught. (With practice this will not happen again).
- Methods 2 and 3 allow an active shield guidance for two-handed weapons.
The strap should be attached to the extension of the grip. This is the only way to keep the design on the shield properly aligned when the shield is carried on the back.
It should be possible to vary the strap length so that it can be adapted to different needs. Be it the changed circumference due to armour and gambi or simply because different ways of fighting with the back shield make it necessary. (E.g. active shield handling for Dane axe fighters) Therefore a different strap length is always necessary to be effective and comfortable.
Painting
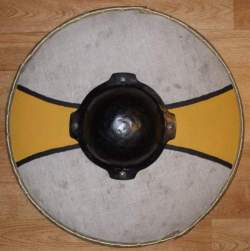 A good shield also needs to be well painted.
Early medieval round shields did not have any coat-of-arms-like painting. However, it did happen that shields for battles were marked with a uniform colour. This is usually done differently in contemporary fencing groups and market guilds. Therefore, when choosing a motif, it is wise to make sure that it is either not yet in use or certain that it will find favour if it is used.
In any case, when choosing a sign, care should be taken that it fits the representation. It is assumed that in the Early Middle Ages the painting was also considered to have a certain protective effect for the wearer of the shield, so that corresponding images or colours were used.
For the first shield, I recommend leaving the shield in the fabric colour or choosing a uniform colour.
When choosing colours, I see two ways: Fabric is used that has been dyed beforehand. This means that all colours are possible that are also possible for clothing. And all colours are possible whose pigments are easy to produce. That would be, for example, all stone colours and also charcoal for black.
further tips:
- The colours should be easy to distinguish for people with colour vision deficiencies.
- The colours should have a good black-white contrast so that they can be seen well in peripheral vision or at dusk.
- The line width should not be too small (2 cm) so that it can be seen from a great distance. Sub-patterns are possible, i.e. at a great distance the broad and clearly drawn line is seen and at close range further details can be recognised. Further subtleties are added or even reinterpretations become visible.
- For motifs, first draw in the horizontal while holding the shield in your hand. The grip deviates by about 30° inwards from the vertical, so that a motif aligned with the grip is presented at an angle when you hold the shield regularly.
Example shields
| Designation | Diameter | Camber Depth | Shield Thickness | Edge Thickness | Weight | Weight Index |
|---|---|---|---|---|---|---|
| Curved 85 | 85 cm | 9 cm | 9 mm | 18 mm | 4170 g | 0,73 g/cm2 |
| Curved 81 | 81 cm | 8,5 cm | 8,5 mm | 18 mm | 3505 g | 0,68 g/cm2 |
| Curved 78 | 78 cm | 7,5 cm | 9 mm | 12 mm | 3825 g | 0,80 g/cm2 |
| Straight 88 | 88 cm | - | 7,5 mm | 19 mm | 4050 g | 0,67 g/cm2 |
| Straight 80 | 80 cm | - | 9 mm | 12 mm | 4011 g | 0,80 g/cm2 |
| Straight 80 | 80 cm | - | 7 mm | 10 mm | 3125 g | 0,62 g/cm2 |
| Straight 60 | 60 cm | - | 6 mm | 15 mm | 1840 g | 0.65 g/cm2 |
| Straight 50 | 50 cm | - | 8 mm | 13 mm | 1803 g | 0,92 g/cm2 |
| Ikea shield 45 | 45,5 cm | 5 cm | 9 mm | 12 mm | 1567 g | 0,96 g/cm2 |
| Buckler 30 | 30,5 cm | - | 9 mm | 12 mm | 808 g | 1,11 g/cm2 |